Concrete Floor Crack Repair
How I permanently repair cracks in concrete floors and slabs
Concrete floor crack repair can be accomplished rather easily with RadonSeal's DIY concrete floor repair kit.
Look, it's no secret, concrete floors crack. Even when the sub-grade is prepared properly, the concrete is placed and finished correctly, and expansion joints are sawed to control the cracks, a crack seems to appear sooner or later.
As a concrete floor contractor, I've seen a lot of cracked concrete floors. I've also tried a lot of different ways to repair cracks in concrete slabs and floors.
After using a lot of different concrete repair and patching materials, I discovered RadonSeal crackweld concrete floor repair kit.

This crack repair kit has made fixing and sealing cracks in concrete floors very quick, easy, and economical for us and my customers.
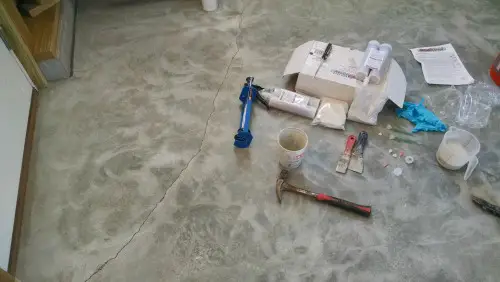
What's included in the concrete floor crack repair kit

The picture above shows the duel cartridge kit. This is the one I buy since repairing cracks in concrete floors is part of my business.
Everything you need to fix a crack is included in the kit. The caulking gun, epoxy resin, sand, gloves, tips. A few other tools I found are helpful are a puddy knife, palm sander with 30 grit sandpaper, or 4" hand grinder with a diamond grinding wheel. (you'll see why in the video below)
RadonSeal also sells a single cartridge kit if all you have is one or two cracks to repair. The caulking gun is not included in this kit.
Here's a picture of the crack in the concrete floor I'm going to show you how to repair. The crack is about 6 feet long and up to 1/4 inch wide.
We're preparing this garage floor for an epoxy coating so we want to weld this crack back together so it doesn't show through the new epoxy flooring.
I'll explain how we prepare for and repair a crack like this, then you can watch my video to see for yourself how we repaired this crack.
Preparing the crack before you repair it
The crack needs to be clean and dry. I run a 4 inch grinder over the crack to clean the surface, then I vacuum it out to remove any dust & debris in the crack.
You can just use a wire brush if you don't have a grinder, you want to make sure the surface is clean and there isn't any loose concrete or dirt in the crack.
Putting the crack repair kit together
The kit comes with detailed instructions to follow. The first thing I do is take everything out of the kit and lay it on the floor.
Then follow these steps:
- Grab the cartridge and unscrew the top. (save this top, you'll need it)
- Remove the protective cap on the top of the cartridge. You may be able to break it off with your fingers, if not, tap it with a hammer to break the seal then break it off.
- Keep the cartridge held upright and place it in the caulking gun.
- Insert the little back-flow restrictor piece into the top of the cartridge. (right where you broke off the protective cap)
- Set on the mixing nozzle over the back-flow restrictor and use the same retaining nut you unscrewed from the top to tighten down the mixing nozzle.
- Purge (squirt) some material into a cup first to make sure the material is mixed correctly.
- You now ready to repair the crack.
Repairing the crack in the concrete floor
Note: After you've purged the cartridge, keep it pointed downwards.
If the crack is wider than 1/4 inch, you will want to fill the crack up half way with sand first. If you don't, you'll loose a lot of the repair resin down through the crack.
If the crack is under 1/4 inch, follow the steps below:
- Wet out the crack by injecting some of the resin into the crack.
- Fill the crack with the silica sand.
- Go over the sand again with the epoxy resin.
- Use the puddy knife to mix the sand and resin, making a paste and forcing it into the crack.
- Leave this epoxy paste a little higher than the concrete floor.
- Wait about 10 minutes and scrape or sand the excess level with the concrete floor.
Note: This repair material hardens very quickly. You won't want to stop and leave the caulking gun sitting on the floor before you're finished. You can stop for 30 - 60 seconds but not more than that or the resin will harden in the tip.
The resin is quite firm at after 3 minutes and usually fully hard at 10 - 15 minutes. If you have a long crack to repair, I suggest doing 10 to 15 feet at a time.
I own some 4" hand grinders, so I always grind the repair material smooth. It's not necessary to do this, but this method a very easy way to remove any excess material.
If you're going to grind the cracks afterwards, you can repair all your cracks first, then come back and grind them. If you're scraping them with a puddy knife or sanding with a palm sander, then do this after about 10 - 15 minutes.
If you have some repair resin left in the cartridge, unscrew the tip and replace the cap. Screw on the nut and store the cartridge in an upright position. Don't let the material freeze..
Watch a video of me repairing a crack in a concrete floor
I highly recommend these concrete floor crack repair kits. The kits along with the customer service from RadonSeal are excellent. That's why I use them.
Coverage: For full-depth repair of a standard 4” slab, each CrackWeld kit will repair:
Purchase the CrackWeld 2-pack kit to repair up to 50 ft. of a 1/16” wide crack or 25 ft. of a 1/8" crack.
Purchase the Crackweld 4-pack kit to repair up to 100 ft. of a 1/16” wide crack or 50 ft. of a 1/8" crack.
You'll need a single cartridge caulking gun for the kits above.
Purchase the Crackweld Pro kit to repair up to 100 ft. of 1/16" wide crack and you plan to start repairing cracks for your business.
 Epoxy Floor installed by Day's Concrete Floors, Inc.
After using the concrete floor crack repair kit to fix 3 cracks in the concrete floor, we applied our grey epoxy coating and the floor looked great. The customer was very satisfied.
Go from Concrete floor crack repair to epoxy concrete repair

Hi, I am Mike Day, owner of Day’s Concrete Floors, Inc. in Maine. I've been working with concrete for 40 years now, and this website is where I can share with you all the knowledge, wisdom and expertise I've gained from installing all kinds of stamped concrete, concrete floors, concrete overlays, concrete slabs and also repairing & fixing cracked or spalled concrete.
There’s a lot to cover, so if you have any questions, contact me!


LEARN HOW TO EPOXY A GARAGE FLOOR

FREE CONCRETE FINISHING TRAINING TUTORIAL VIDEO
Recent Articles
-
Don't get over charged! Here's my concrete slab cost for 2024
 I'm a concrete contractor that will tell you how much a concrete slab will cost. These are my actual prices I charge for 2024 when I quote my customers.
 -
The tools I use to do concrete work - Use the same tools I do.
 Learn about and purchase the tools I use to do concrete floors, stamping, staining, polishing, countertops, sawing and a whole lot more.
 -
How To Make Concrete Without A Mixer - Mixing Concrete by Hand
 Learn how to make concrete manually without a mixer. Explore simple steps and tips to achieve the right consistency and strength for your construction project.
 -
What are the Correct Concrete Mixing Ratios - Ratio Chart
 The proper concrete mixing ratios are 1:2:3, 1:3:3, 1:2:4 for cement, sand, and stone. Mixing ratios are based on what psi concrete you need. Mixing ratio chart
 -
Concrete Mix Ratios For 3000, 3500, 4000, and 4500 psi concrete
 Learn the precise mix ratios for concrete strengths of 3000, 3500, and 4000 psi to ensure durability and stability in concrete construction.