How to caulk a concrete expansion joint
Author: Mike Day
Recently updated content
 Using self-leveling caulking to fill this concrete expansion joint
Caulking concrete expansion joints is an essential maintenance task that helps to protect the integrity and longevity of concrete structures.
Expansion joints allow concrete to expand and contract with changes in temperature and humidity, preventing cracks and other types of damage.
Over time, these joints can deteriorate and require repair or replacement. Caulking the joint is a simple and effective way to seal gaps and prevent moisture, debris, and other contaminants from entering the joint.
step by step guide on how to caulk concrete expansion joints
In this guide, we will explore the steps involved in caulking a concrete expansion joint, including the tools and materials required, preparation, application, and finishing techniques.
step 1. Gather the tools and materials you need
You'll need some specific tools and materials to caulk your expansion joints. I like to use self-leveling caulking because it smooths itself out really nicely.
I also use some foam backer rod that I push down into the joint, this helps keep the caulking from sinking to the bottom of the joint.
Here's a list of tools and materials you'll need:
- Caulking gun
- Tube of self-leveling caulking
- Utility knife
- Shop Wet & Dry Vacuum and or leaf blower
- Wire brush
- Clean rags
- Gloves
step 2. clean and prepare the expansion joint
The concrete expansion joint has to be very clean and dry before you can caulk it.
On new concrete driveways, walkways, and slabs, using a good shop vacuum is usually good enough to clean out any dirt, debris, and loose concrete.
If you're concrete is older, there's probably a lot of dirt packed down inside the joint. The best way to clean older expansion joints is to pressure wash the joint and blast out the dirt.
If you don't have a pressure washer, just use a hose with a good nozzle and squirt the water out of the joint.
Afterwards, use a leaf blower and blow all the residual water out of the joint. The joint has to be completely dry before you apply the caulk.
It could take the joints 24 -48 hours or more to completely dry out, especially if you don't blow out the water.
step 3. (Optional) insert foam backer rod into the joint

If your expansion joint is 1/4" wide or more, it's probably quite deep also. You don't want to use any more caulking than you have to.
It's better to insert a foam backer rod down inside the joint to prevent you from loosing all your caulking settling to the bottom of the joint.
Backer rod is a foam, tub-like material that comes in many sizes. It fits tightly into the joint and prevents the caulking from seeping to the bottom of the joint.
You only need to caulk the top half inch of a concrete expansion joint for it to be waterproof.
I use backer rod that's an 1/8" larger in diameter than the joint so it fits snug inside the joint. You can use a screw driver to push it into the joint or buy the backer rod tool if you have a lot of joints to caulk.
PRO TIP: If you're joints are wide and deep, using backer rod is a must, otherwise the self-leveling caulking will just settle to the bottom of the joint.
step 4. prepare the caulking tube for use
Use a utility knife to cut the tip of the caulk tube at a 45 degree angle. The size of the opening should be slightly smaller than the width of the joint.
You may need to insert a small screw driver or thin wire down inside the tip to puncture the tube and release the caulking.
PRO TIP: Most caulking guns have this rigid wire attached to them just for this purpose.
Insert the caulking tube into the caulking gun, make sure to keep the nozzle tipped upwards until you're ready to start.
Squeeze the caulking gun handle/lever to snug the tube and ready it for caulking the joint.
step 5. apply the caulking
Place the tip of the tube into the joint and hold the caulking gun at a 45 degree angle.
Lightly squeeze the handle, you should see the caulking start to flow out of the end of the tip.
Squeeze the handle, go easy, and apply an even bead of caulk to the joint. Fill the joint about even with surface of the concrete and be careful not to overfill it.
PRO TIP: Remember, the caulking is self-leveling, it may settle slightly as you caulk the joint. If this happens just run a small bead of caulk right back over the joint to fill it.
Also, if you need to stop before the tube is empty, I release the pressure of the handle on the tube and place my finger over the tip end to block any caulking from leaking out the end.
step 6. (optional) smooth the caulk
If you don't use self-leveling expansion joint caulking, you're going to have to smooth out the top of the caulk.
You can use your finger, with a rag to keep wiping your finger clean, or use a caulk smoother tool.
Then, clean up any excess caulk with a damp rag if you need to.
step 7. allow the caulk to dry
The dry times of caulking will vary depending on which kind you use and the outside temperatures at the time of installation.
Allow the caulking enough time to dry completely before it's exposed to water or foot traffic.
Drying times could be a few hours to a couple days depending on the weather.
inspect the filled concrete expansion joint
After the caulking is dry, inspect the joint to make sure there's no gaps or low spots that need more caulking.
If you find an area that needs touch-up, just apply some more caulking and blend it to the cured caulk.
what is the best way to seal concrete expansion joints
Michael from MICHAEL BUILDS on You Tube created a really good video with 20 tips and tricks about how to seal an expansion joint.
He's using Rapid Set Self-Leveling Sealant to caulk some joints in his demonstration.
Check out the video below to see how he seals cracks and joints in some concrete walkways.
In the picture below, we're using a self-leveling caulking to seal this expansion joint around an island at a drive-thru area for a credit union.
There was a foam isolation joint material between the broom finish concrete slab and the island area.
We removed the top half inch of the foam and applied some self-leveling caulking to seal off the joint.
should you caulk concrete expansion joints?
 I'm sealing an expansion / isolation joint using self-leveling caulking
Yes absolutely, we always use a foam material between the new concrete and the outer edge of what we're pouring concrete up against.
You want the concrete to be able to expand and contract, the foam will let it do that. But, you also want to seal that joint so water doesn't get in there and cause problems.
Especially in freeze/thaw areas like this one at a drive-thru area for a bank in Maine.
The foam material we use is called Isolation strip-off foam. The top half-inch is perforated so it will peel off easily after the concrete hardens.
It comes in rolls 50 feet long and various sizes like 1/2" thick x 4", 6", and 8" wide.
We use a spray adhesive to adhere the strip-off to whatever we're pouring concrete up against.
In this case, we sprayed adhesive on the granite and on the strip-off material, waited a few seconds for it to tack up, and it stuck to the granite very well.

PRO TIP - Once you peel off the top half-inch, clean out any debris with a vacuum. If there are any voids that look like they go deeper (the granite edge is rough in some areas) use some silica sand or some traditional caulk material to fill that void.
If you don't fill the gaps first, the self-leveling caulking will just keep sinking to the bottom of the void. You could easily waste a whole tube trying to fill what looks like a small gap.
Another TIP - Self-leveling caulking is very fluid. Once you start caulking, the material flows out of the tube very freely.
If you have to stop or pause for a moment before the tube is empty, stop squeezing the handle about a foot before you have to stop and let gravity slow the caulking from coming out the end of the tip.
Have a rag and a small empty cup readily available to put the end of the tube into after you're done.
what is the best caulk for concrete expansion joints
When choosing the best caulk for concrete expansion joints, it is important to look for a product that is specifically designed for use in concrete applications.
Here are some of the characteristics to look for:
- Durability: The caulk should be able to withstand exposure to UV rays, temperature fluctuations, and moisture without cracking or shrinking.
- Flexibility: The caulk should remain flexible even after it has cured, to allow for movement in the joint.
- Adhesion: The caulk should adhere well to the sides of the joint and to the surrounding concrete, to create a tight seal.
- Easy application: The caulk should be easy to apply with a standard caulking gun and should have a smooth, consistent texture.
Based on these characteristics, one of the best options for caulking concrete expansion joints is a polyurethane-based caulk. Polyurethane caulking is highly flexible and durable, and it adheres well to concrete surfaces.
It's also resistant to moisture and UV rays, making it ideal for outdoor applications. Some other good options include Silicone and hybrid polymer caulks, which also offer excellent adhesion and flexibility.
I personally like Sikaflex Crack Sealant and Rapid Set Self-Leveling Sealant. If either one of these is available in your area, they both work really good.
If neither one of those is available, make sure to choose one that's specifically labeled for concrete and exterior use.
frequently asked questions
Here are ten frequently asked questions and their answers about caulking and sealing concrete expansion and isolation joints:
1. What is the purpose of caulking concrete expansion joints?
- Answer: The purpose of caulking concrete expansion joints is to prevent moisture, debris, and other contaminants from entering the joint, which can lead to cracking and other types of damage.
2. What is the difference between an expansion joint and an isolation joint?
- Answer: An expansion joint is designed to allow concrete to expand and contract with changes in temperature and humidity, while an isolation joint is designed to separate two different concrete structures or elements to prevent cracking due to differential settlement.
3. How often do I need to caulk my concrete expansion joints?
- Answer: The frequency of caulking will depend on the specific conditions and movement of your concrete, but as a general rule, it is a good idea to inspect and re-caulk your expansion joints every 1-3 years.
4. How do I know when it's time to replace the sealant in my expansion joint?
- Answer: Some Signs that the sealant in your expansion joint may need to be replaced include cracking, deterioration, or separation from the surrounding concrete.
5. Can I seal my concrete expansion joints with something other than caulk?
- Answer: Yes, you can also use a liquid rubber joint sealant or a flexible epoxy-based sealant to seal your expansion joints.
6. Can I caulk or seal my expansion joint in wet conditions?
- Answer: It's best to avoid caulking or sealing expansion joints in wet conditions, as moisture can interfere with the adhesion of the caulk or sealant. Wait for dry weather before sealing the joint.
7. How long does it take for caulk or sealant to dry?
- Answer: Drying times can vary depending on the product and weather conditions, but most caulks and sealants will dry within a few hours. Check the manufacturer's instructions for specific drying times.
- The Rapid Set Sealant - Will dry tack-free in 30 minutes at 1/4" at 70°F (21°C), 50% relative humidity.
- The Sikaflex Crack Sealant - Will dry tack free in 1 - 2 hours at 1/4" at 70°F (21°C), 50% relative humidity.
8. Do I need to remove old caulk before applying new caulk?
- Answer: Yes, it is important to remove any old caulk or sealant before applying new caulk to ensure a good seal. Use a utility knife or other tool to remove the old material, and be sure to clean the joint thoroughly before applying new caulk or sealant.
9. Can I paint over caulk or sealant?
- Answer: Yes, once the caulk or sealant has dried completely, it can be painted over with most types of paint. Be sure to choose a paint that is compatible with the caulk or sealant and follow the manufacturer's instructions for best results.
10. What is the best time of year to caulk or seal concrete expansion joints?
- Answer: The best time of year to caulk or seal concrete expansion joints is during dry weather conditions when the temperature is between 50-80 degrees Fahrenheit.
PRO TIP: Avoid sealing the joints during extremely hot or cold weather, as this can cause the caulk or sealant to shrink or expand excessively, leading to a poor seal.
Additionally, it is important to allow the caulk or sealant time to dry completely before exposing it to rain, foot traffic, or vehicle traffic, so plan accordingly.
Find more information about Concrete Expansion Joints.

Hi, I am Mike Day, owner of Day’s Concrete Floors, Inc. in Maine. I've been working with concrete for 40 years now, and this website is where I can share with you all the knowledge, wisdom and expertise I've gained from installing all kinds of stamped concrete, concrete floors, concrete overlays, concrete slabs and also repairing & fixing cracked or spalled concrete.
There’s a lot to cover, so if you have any questions, contact me!


LEARN HOW TO EPOXY A GARAGE FLOOR

FREE CONCRETE FINISHING TRAINING TUTORIAL VIDEO
Recent Articles
-
The tools I use to do concrete work - Use the same tools I do.
 Learn about and purchase the tools I use to do concrete floors, stamping, staining, polishing, countertops, sawing and a whole lot more.
 -
How To Make Concrete Without A Mixer - Mixing Concrete by Hand
 Learn how to make concrete manually without a mixer. Explore simple steps and tips to achieve the right consistency and strength for your construction project.
 -
What are the Correct Concrete Mixing Ratios - Ratio Chart
 The proper concrete mixing ratios are 1:2:3, 1:3:3, 1:2:4 for cement, sand, and stone. Mixing ratios are based on what psi concrete you need. Mixing ratio chart
 -
Concrete Mix Ratios For 3000, 3500, 4000, and 4500 psi concrete
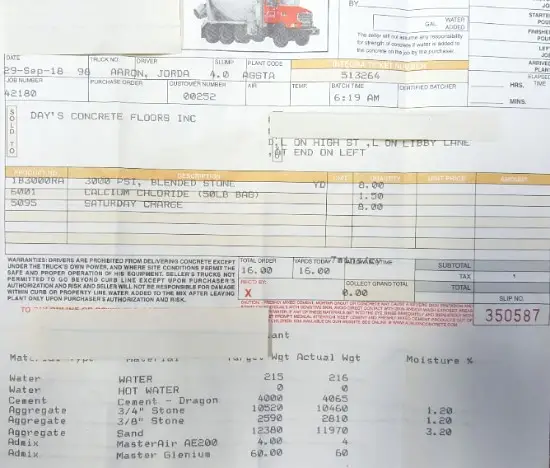 Learn the precise mix ratios for concrete strengths of 3000, 3500, and 4000 psi to ensure durability and stability in concrete construction.
 -
Don't get over charged! Here's my concrete slab cost for 2023
 I'm a concrete contractor that will tell you what a concrete slab will cost. These are my actual prices I charge for 2023 when I quote my customers.
