Foundation Crack Repair
"Learn how to FIX your own leaky crack and save yourself a
TON of money"

Foundation crack repair is a step by step process done by injecting a two-part polyurethane foam into the crack to permanently seal it from leaking.
As a pro, I do this all the time for my customers. If you follow my step by step guide and use the foundation repair kit I recommend below.....
You can fix your own leaky crack and save yourself a lot of money.
"THIS IS THE FOUNDATION CRACK REPAIR KIT I USE":

I use RadonSeal's DIY Foundation Crack Repair Kit when I fix a leaking crack for my customers.
The repair kit comes with everything you need to fix your cracked wall. You just use your own standard caulking gun.
This is by far the easiest repair kit I have ever used, and trust me, I've used a lot of them over the past 30 years.
The 9 basic steps to inject your crack and permanently seal it.
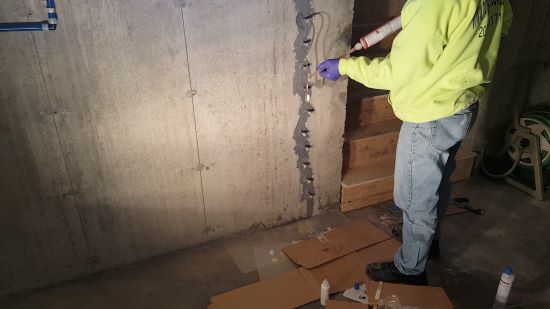
STEP 1. Clean the crack using the included wire brush.
Then vacuum the crack to make sure it's clean with no dust or debris blocking the crack.
PRO TIP: The surface must be dry to install the injection ports and surface epoxy.
If you have to dry the surface, use a hair dryer, small leaf blower, or air compressor to dry it.
If water is coming out of the crack, wait for it to stop, then proceed.
STEP 2. Mix up a small amount of the epoxy paste, using the putty knife, apply just enough paste to the bottom of an injection port and stick it on the wall right over the crack.
Be careful not to block the HOLE on the bottom of the injection port, just apply a little to the outside edges of the bottom.
Start the first port about 4" off the floor and install ports every 8" up to the top of the crack.
NOTE: Make sure the epoxy paste doesn't block the crack under the port HOLE when you apply it to the wall.
PRO TIP: PORT ATTACHMENT - Use the separate wooden mixing sticks to mix the epoxy paste. Don't mix them up, use one for part A and the other one for part B.
Place the epoxy paste on a piece of cardboard and use a SEPARATE stick or the putty knife to mix them together.
I like to only mix about a large tablespoon of each part, A & B, together at one time.

STEP 3. After all the ports are installed, mix up more epoxy paste and completely seal off the outside of the crack. Go about an inch wider on either side of the crack.
Paste over the bottom of the ports really good to make sure you don't get any leaks when you inject into them.
PRO TIP: When sealing the surface of the crack, I only mix a small amount of epoxy paste (like with the ports) at a time.
You'll have about 5 - 7 minutes working time with each small batch, this is plenty of time to make sure the surface is sealed off really good.
STEP 4. Flush the crack with water by squirting 1 - 2 bottles (bottle is included) of water into the top 2 ports.
Water should exit from every port, telling you none of the ports are blocked.
The water also aids in the expansion of the injection repair foam.
NOTE: It may only take a few seconds for the water to come out of each port or it could take a minute or two.

STEP 5. After the epoxy paste is dry, or fingernail hard, (approx. 1 hour) assemble the repair cartridge and start injecting into the first port.
- place cartridge into your caulking gun
- remove the plastic nut, then twist and pull to remove the plastic seal
- place the mixing nozzle over the end of the cartridge and attach it with the plastic retaining nut
- attach the flexible hose (wide end) over the mixing nozzle by pushing firmly
- for a vertical crack like this one, attach the small end of the hose into the lowest port (horizontal cracks you can start at either end
- start slowly injecting, allow the repair resin to flow into and fill the crack.
PRO TIP: In order for this to be successful, the injection has to be done slow and with consistent low pressure from you.
A hairline crack could take up to 3 minutes (or more) at each port to full the crack correctly.
STEP 6. As soon as you see the repair resin start to flow from the next higher port, unplug the hose and plug it into that port. (Port #2)
Plug the first port with the port cap.
You can easily do this yourself or have a friend help you.
Make sure you have plastic on the floor to contain any drips during the process.
STEP 7. Continue moving up the crack, port by port, until you reach the top and see repair resin (foam) coming out of the top of the crack.
PRO TIP: If you see some pin-hole leaks during the injection process, don't worry, just keep injecting.
These pin-holes will foam up and seal themselves off.
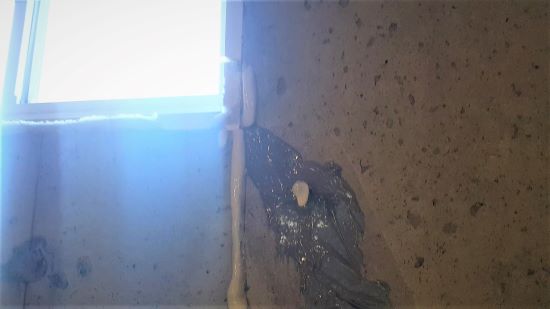
STEP 7B. When you inject resin into the top port, as soon as you see resin coming out of the top of the crack, stop injecting and plug the last port.
After a few minutes, this is what the top of the crack will look like. This is perfectly normal and what you want to see.
The crack is now permanently sealed and won't leak any more.

STEP 8. Wait about 3 - 4 hours (or the next day) for the foam to cure and harden.
STEP 9. Break off the injection ports using a hammer and tapping them side to side.
YOU CAN BUY THE INJECTION REPAIR KIT BY CLICKING ON THE PICTURE BELOW!
My simple foundation crack repair method...
HERE ARE THE 9 STEPS:
- Clean the crack with a wire brush and vacuum it
- Mix up a small amount of epoxy paste and epoxy the injection ports onto the wall. Start 4" off the floor and install them every 8" up the crack.
- Mix up epoxy paste and completely seal off the ports and the outside of the crack.
- Flush the crack by squirting 1 - 2 bottles of water into the top ports. Water should exit from every port below. Telling you none of the ports are blocked. The water aids in the expansion of the repair foam.
- After the epoxy paste is dry, assemble repair cartridge, nozzle, and injection tube and start injecting at the bottom port.
- As soon as you see repair material coming out of the next higher port, remove the tube from first port and move it to the second one. Put stopper in first port. Start injecting 2nd port.
- Continue this process, moving up one port at a time, until you see foam coming out of the top of the crack.
- Wait 3 - 4 hours for the foam to cure/harden
- Break off injection ports by tapping them with a hammer
Here's a case study of one of my jobs:
My company, Day's Concrete Floors, Inc was asked to repair 75 cracks in the concrete walls of a large warehouse for VIP Tires & Service.
These cracks were all less than 1/4 inch wide and went from the top of the foundation wall to the concrete floor.
Most of the cracks leaked water when it rained out which lead to the floor getting very wet. The owners needed the cracks fixed and the foundation water tight.

This is a picture of the warehouse above. The cracks in the foundation were all the way around the perimeter of this 500' x 150' building

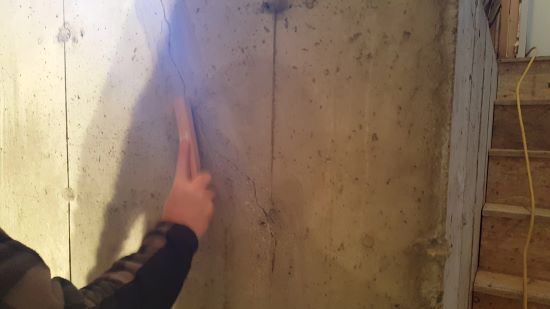
Here's a look at one of the cracks in this foundation.
Most of them were like this, some were not so wide. As you can see, like most of them, this crack is leaking water from the outside.
 |
 |
Here's a couple more cracks above. Some cracks were leaking from the middle of the foundation, some from just the bottom, and some from the top.
The plastic "tabs" you see in the picture are the injection ports we have already installed in preparation for fixing and waterproofing the crack.
The foundation crack repair kit I use is from RadonSeal. They've got an easy to use DIY crack repair kit that includes everything you need to fix cracks like the one's above.
Installing the injection ports
 THIS IS RADONSEAL'S PRO KIT
The first thing we did was clean the cracks with a wire brush.
The wire brush will remove any loose concrete, dirt, and dust.
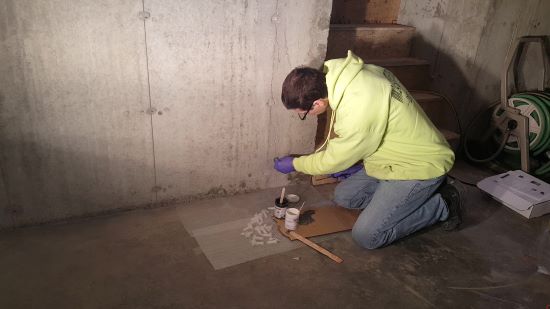
Then we mixed up some of the epoxy surface sealer to install the injection ports like you saw in the pictures above.
The epoxy comes out of the tube in 2 parts, one is black and one is white. When you have both parts mixed correctly, the epoxy will turn grey.
Just put a little on the back of the port and stick it over the crack.
Do this about every 8 inches from the bottom of the crack to the top.
 |
 |
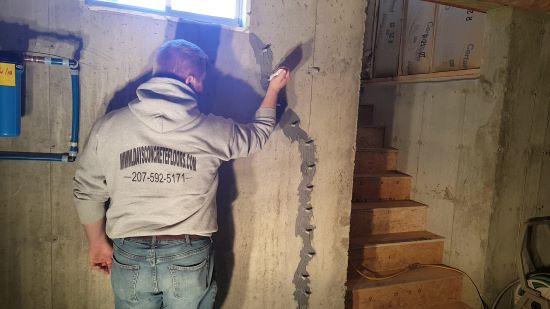
Once all the tabs are in place, the crack needs to be sealed on the surface using the epoxy surface sealer.
Using the included putty knife, smear enough epoxy over the crack and the tabs to completely seal the crack.
The foundation crack repair material that gets injected into the ports is very fluid and will leak out of any holes that aren't sealed up.
Sealing the surface of the crack

Sealing the crack with the epoxy sealant is quite easy. An 8 foot crack took us about 2 minutes to seal after the ports were in place.

This is what a foundation crack will look like after you have installed all the injection ports and sealed the surface of the crack with the epoxy.
It takes between 2 and 4 hours for the epoxy to dry before you can inject the crack with the repair material.
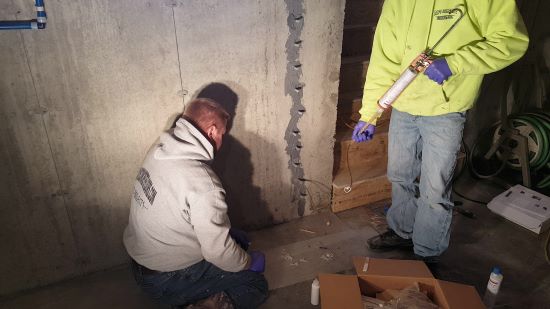
Injecting the crack with 2-part polyurethane resin
|
This kit has a 2 component polyurethane foam we injected into the cracks to repair and seal them. We use this material because it expands up to 20 times its volume, filling up the entire depth of the crack with hydrophobic foam that repels water and will not break down over time. 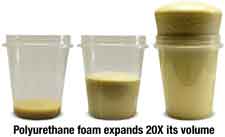 |

Once the polyurethane has cured, the foundation crack will never leak again because water can't penetrate it from the back side.
Don't buy the cheaper single component foam kits. Their repair foam breaks down over time and the crack will leak again.
We started injecting the crack from the bottom. Once we saw fluid coming out of the next port, we removed the hose, plugged the port with the plug cap and inserted the hose into the next port.

Sometimes it took anywhere from a few seconds to a couple minutes for the liquid foam to get to the next port. It all depends on the size of the crack.
Most of the time it took me under a minute. Most of the cracks took me about 5 to 15 minutes to fully inject.
The really narrow hairline cracks took the longest because I had to really take my time squeezing the polyurethane into the crack.
The foundation crack repair after it's sealed
|
This is what the foundation crack will look like when the polyurethane foam is dry. You can see the foam after it has expanded. Some of it came out of the top of the crack and some of it found some pin holes we either didn't get sealed up or couldn't see because they were so small. This foundation crack was completely repaired and water tight after using the repair kit from RadonSeal. All 75 cracks we injected were water tight after being repaired. |
 |
Below are a couple other cracks showing the foam after it has expanded. Most of the time the excess foam comes from the top of the wall where the crack isn't sealed
 |
 |
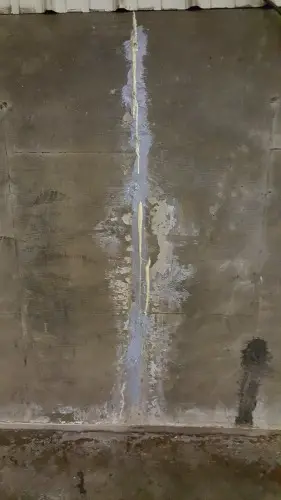
The picture below really tells the story of how well this foundation crack repair material works. This picture is of the back side of one of the cracks.
The 2 component urethane foam has completely expanded to seal the entire crack from top to bottom. Water can no longer penetrate this crack.

We had great success using RadonSeal's 2 component polyurethane foundation crack repair kits on this job.
I highly recommend using their repair kit for your foundation cracks.
RadonSeal has a PRO kit for contractors like me who do these repairs a lot and they have a DIY kit for the homeowner who only has 1 or 2 foundation cracks to repair.
I have a video turorial of me that teaches you how to use these foundation repair kits.
In the tutorial, I'm showing you all my PRO TIPS and secrets I've learned from repairing 100's of cracks like the ones above.
It's only 15 dollars, It will break down all the steps for you, from START to FINISH, so you can rest assure you'll fix your crack correctly.
What does foundation crack repair cost?
Well, I surely can't speak for all the crack repair specialist near you, but I can tell you I charge $500 dollars per crack when I fix foundation cracks for my customers.
If you buy my repair tutorial, it'll be just like hiring me for a fraction of the cost.
Now, if you're pretty handy around the house you may not need the tutorial....
But I tried to make it affordable enough for anyone who might have any questions or concerns. So you can make sure you get it repaired correctly in one try.
Here's a mini-version of the repair tutorial
for you to check out

Hi, I am Mike Day, owner of Day’s Concrete Floors, Inc. in Maine. I've been working with concrete for 45 years now, and this website is where I can share with you all the knowledge, wisdom and expertise I've gained from installing all kinds of stamped concrete, concrete floors, concrete overlays, concrete slabs and also repairing & fixing cracked or spalled concrete.
There’s a lot to cover, so if you have any questions, contact me!
CHECK OUT OUR SPONSORS


LEARN HOW TO EPOXY A GARAGE FLOOR

FREE CONCRETE FINISHING TRAINING TUTORIAL VIDEO
Recent Articles
-
The Most Frequently Asked Questions About Concrete
 Find the answers to the most frequently asked questions about concrete on the internet
 -
How Many 60lb Concrete Bags Make A Cubic Yard? The Complete Guide
 Discover the number of 60lb concrete bags needed for a cubic yard. Get accurate calculations for your construction project.
 -
The True Cost of Polished Concrete: A Detailed Breakdown
Get the facts on polished concrete floor cost. Learn average prices per square foot and key factors impacting your budget in this guide -
How To Fix A Leak In A Basement Wall - Foundation Crack Repair
 How to fix a leak in a basement wall. I have a video tutorial that shows you the steps to take to fix a crack in your foundation wall.
 -
How much does a concrete patio cost for 2025 - New Updated Prices
 New and updated prices for what a concrete patio will cost you in 2025.


