how to fix blotchy concrete sealer
on exposed aggregate patio slab
Updated: March 7, 2025
Author: Mike Day
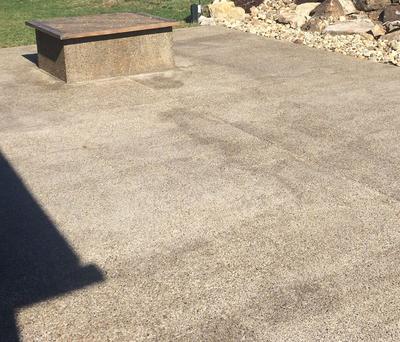
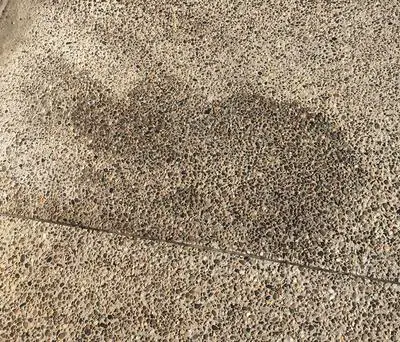
DIY'er needs help repairing blotchy year old exposed aggregate patio sealer
QUESTION:
I have a one-year-old poured concrete patio 32' x 16' with an exposed aggregate finish that I believe was stained with a black walnut stain added to Euclid sealer product.
Was it sealed too early by the contractor? It appears quite blotchy (see photos). I'm Looking to repair it with at least a unified brown look.
Answer:
It sounds like your exposed aggregate patio was sealed with a Euclid sealer mixed with a black walnut stain, but the finish has turned out blotchy.
There are several possible reasons for this issue, including improper application, sealing too early, or uneven absorption of the stain and sealer.
I’ll break down the potential causes, provide a solution to unify the color, and offer maintenance tips to keep your patio looking great for years.
Possible Causes of the Blotchy Appearance
- Sealed Too Early – If the contractor applied the sealer too soon after pouring, excess moisture could have been trapped, leading to uneven curing. Fresh concrete needs at least 28 days to cure properly before applying sealer.
- Uneven Sealer Application – If the sealer was applied inconsistently, certain areas may have absorbed more stain than others, causing blotchiness.
- Moisture Issues – If the surface was damp when sealed, the moisture could have interfered with the penetration of the stain and sealer, leading to discoloration.
- Inconsistent Staining – When stain is mixed into a sealer instead of applied separately, achieving a uniform color can be tricky because the distribution of pigment is not always even.
- Wear and Weathering – If some areas of the sealer have worn off faster than others, the patio could appear patchy, especially under different lighting conditions.
How to Fix the Blotchy Appearance and Achieve a Uniform Brown Look
To achieve a consistent, unified brown finish, you may need to strip the existing sealer and reapply a new stain and sealer correctly. Here’s a step-by-step approach:
Step 1: Strip the Existing Sealer
- Use a solvent-based sealer stripper designed for exposed aggregate.
- Apply it according to the manufacturer’s instructions, usually by rolling or spraying.
- Let it sit for the recommended time (typically 15–30 minutes) and then scrub or pressure wash it off.
- Ensure all residue is removed and let the surface dry completely before proceeding.
Step 2: Restain the Concrete
- If you still want a brown color, use a penetrating concrete stain that is designed for exterior use.
- Test the stain in an inconspicuous area to confirm the color matches your vision.
- Apply the stain evenly using a sprayer or roller, following the product instructions.
- Allow proper drying time before sealing (usually 24–48 hours).
Step 3: Reseal the Concrete
- Choose a high-quality solvent-based acrylic sealer designed for exposed aggregate, preferably from Euclid or a similar reputable brand.
- Apply in thin, even coats using a sprayer or roller.
- Allow the first coat to dry before applying a second coat for durability and uniformity.
- Avoid applying sealer in extreme heat or direct sunlight to prevent rapid drying and uneven absorption.
optional:
Use this exposed aggregate sealer instead of staining
Solvent-Based Brown-Tinted High-Gloss Acrylic Concrete Sealer
The Armor AG Brown Sealant is a solvent-based acrylic sealer with a brown tint, designed to protect and enhance exposed aggregate concrete, and pavers with a semi-transparent, high-gloss finish.
It also functions as a cure and seal, helping new concrete cure properly.
Benefits:
- Provides a semi-transparent brown tint with a glossy finish for a rich, enhanced look
- Minimizes damage from water absorption, reducing deterioration
- Protects against wear and abrasion from foot traffic and the elements
- Simple application using a roller or sprayer on concrete and pavers
- Helps prevent mold, mildew, and algae growth
- UV-resistant, breathable, and non-yellowing formula
- Complies with ASTM C1315 and ASTM C309 standards
Long-Term Maintenance Tips for Your Exposed Aggregate Patio
Once your patio is properly sealed and looks the way you want it, maintaining it will extend its lifespan and appearance.
1. Reseal Every 2–3 Years
- Over time, sealer wears off due to UV exposure, foot traffic, and weather conditions.
- A fresh coat every few years helps maintain the color and protection
2. Clean Regularly
- Sweep debris off regularly to prevent dirt buildup.
- Use a mild detergent and water to wash the surface periodically.
- Avoid harsh chemicals or deicers, as they can break down the sealer.
3. Address Stains Quickly
- If you notice oil, grease, or other stains, clean them up immediately to prevent deep penetration.
- Use a degreaser for stubborn stains.
4. Protect the Surface from Heavy Loads
- Avoid dragging heavy furniture or objects across the patio to prevent scratches and damage to the sealer.
- Use protective pads under furniture legs.
5. Watch for Wear and Touch Up as Needed
- If you notice high-traffic areas fading faster, spot-seal them before the entire patio needs resealing.
- Keeping up with minor maintenance prevents major repairs later.
Conclusion:
Your blotchy patio is likely the result of sealing too early, uneven application, or improper staining techniques.
By stripping the existing sealer, properly restaining, and resealing the concrete, you can achieve a more uniform brown color.
Maintaining the patio with periodic resealing and cleaning will keep it looking great for many years. If you’re unsure about tackling the repair yourself, consider hiring a professional concrete contractor to ensure an expert finish.
