Watch as I show you
How to Install a Decorative
Epoxy Chip Floor
This page is all about how to install a decorative epoxy chip floor. I'll explain, step by step, how we do it and I'll also show you in the video I made (bottom of page) of us installing an epoxy chip floor in a garage in Boothbay Harbor, Maine.
My company, Day's Concrete Floors, Inc. installs a lot of epoxy floors. I would have to say the ones with the decorative chips, or flakes, is a very popular choice.
Although I do recommend hiring a professional to install these types of epoxy floors, I know some of you DIY's are going to try this. So I thought it would be a good idea to share some of my experience with you to try and help you eliminate any costly mistakes.

Make sure you check out the video of us showing you how to install a decorative epoxy chip floor in a garage. I think after reading through the steps and watching the video, you'll have a good understanding of what it takes to install a 2 part 100% solids epoxy floor.
Installing 100% solids epoxy on a concrete floor is much different than installing the "Big Box" store brands. I wouldn't recommend using their epoxy, I just don't think it's as high a quality as some of the others you can buy.
Clean and prep the concrete
The first thing I'm asking myself when I look at the concrete floor is, "Is there any cracks or spalling that needs repair?" If there is, I use an epoxy crack repair kit to fix the cracks and small pop outs or spalled areas.
I'm also looking for other "coatings" that may have been previously applied. If the floor was painted or a concrete sealer was used, they have to be removed. I show you how to do this in the video.
I'm also thinking about moisture vapor transmission. I'll cover this in the next step.
Once the cracks and spalls are repaired, if you have any, it's time to clean and prep the concrete for the first coat.
The tools we use to prep the concrete for an epoxy coating
We always grind the concrete to open up the surface and prepare it to receive the first coat of epoxy. The tool we use, most of the time, to do this is called a Diamabrush.
You can rent this at Home Depot, it goes on a floor buffer which you can also rent at HD. This is fairly easy to run and does a good job with the floor prep.
I do not ACID ETCH the concrete to clean it or open up the surface. I do not recommend introducing water into the concrete if you are going to apply an epoxy coating.
Moisture is your enemy, if you acid etch the concrete then neutralize it and rinse multiple times to remove the residue, it will take days for the concrete to "dry out".
Even though the surface of the concrete may look dry, there's still moisture inside the concrete that needs to escape. If you apply the epoxy paint and there's still moisture vapor escaping out through the surface, your epoxy will blister and peel off.
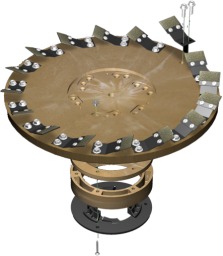
Here's a picture of the diamabrush base we use on a floor buffer. You'll also see us using one in the video.
 |
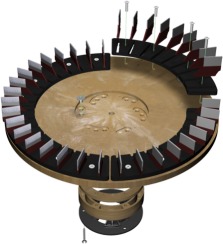 |
These are the two diamabrush bases we use. One is more aggressive than the other, use the more aggressive one if you have paint or concrete sealer on your concrete floor.
The other way we prep the concrete floor is with a 5 or 7 inch hand held grinder that has a diamond disc on it and attach a vacuum to control the dust. See below.

Using this 5 inch hand held grinder with a diamond disc, I lightly ground this room in 10 minutes to prep it for an epoxy coating. If you have a large area to prep, you can rent walk behind floor grinders at most tool rental stores.
Ready to apply the first coat of epoxy
Because moisture vapor plays a big role in most epoxy floor coating failures, we almost always apply our moisture vapor barrier/primer coating first.
This will block moisture from escaping through the surface and causing your epoxy to peel off. It also primes or conditions the concrete so your base coat of epoxy goes down nice and smooth.
The only time I wouldn't use this product is if I installed the vapor barrier under the slab and I poured the concrete floor.
Most all companies who sell epoxy also have a moisture blocker product.
Applying the base coat and broadcasting the decorative chips
Once the vapor barrier primer is dry, usually takes 4-6 hours, you're ready to install the tinted base coat of epoxy. When you're applying multiple coats of epoxy, you have a window of 24 hours to apply the next coat.
If you wait longer than 24 hours to apply the next coat, you have to sand the previous coat to "scratch up" the dry coat so the next one will bond correctly. You can do this with a pole sander and 100 grit sand paper or use the floor buffer with a 120 grit sanding screen.
Most 2-part 100% solids epoxies are mixed at a ratio of 2 parts A to 1 part B. A kit will come in 1 gallon of A and 1/2 gallon of B. Some will come with the A part already colored and some will come with a powdered color packet you add to the epoxy.
Mixing the 2 parts together is quite easy, you'll need a separate bucket, first empty part A into the new bucket then add part B. A battery drill and mixing paddle works best. You'll also have to time yourself, the epoxy we use requires us to mix for 2 minutes. It's very important to follow your product's manufactures instructions.
When you're done mixing the epoxy, it's important you get it out of the bucket and onto the floor. Each kit will do a certain amount of square feet. We apply ours at 100 square feet per gallon. So, if your 1.5 gallon kit will cover 150 sq. ft., measure out this amount of area and pour out the epoxy.
You will need spiked shoes, a rubber magic trowel, edge roller, 18" roller 3/8 nap and your bucket of chips. I figure 1.5 pounds of chips per 10 sq. ft. of floor area for a full broadcast like the one in the video.
Roll your edges first, then use the rubber magic trowel to spread the epoxy around, then back roll with the 18" roller. You'll be walking in the epoxy when you do this.
After the epoxy is rolled out evenly, grab your bucket of chips and walk back into the epoxy. Grab a handful of chips and toss them up into the air a little higher than your head. The chips will spread out as they fall into the epoxy. Continue doing this until the epoxy base coat is completely covered in chips.
Note: Some areas will absorb the chips more than others, these areas will look kind of shiny. Just throw some more chips in these areas as they develop.
Once you've completely covered the floor in chips, let it dry, probably 12 hours (again follow manufactures dry times). Then you're ready for the next step.
Cleaning up the excess chips
There will be excess chips when you do a full broadcast. To clean them up, you could just vacuum them up or you could do what we do and use a leaf blower and blow all of them into a corner. Then just scoop them up and put them into a bucket.
Who knows, you may need some to touch-up an area or if you ever need to repair a small area you'll have some extras to do it with.
After we clean up the chips, the surface will feel kind of rough. You will want to use a floor scraper and pole sander to smooth the surface of the dry chips before you top-coat.
We demonstrate this in the video "how to install a decorative epoxy chip floor", check it out at the bottom of the page.
You could also use the same floor buffer you used before, with a 120 grit sanding screen. This works very well. Just quickly move over the floor, no need to stay in one place very long.
When your done sanding, give the floor a good vacuum.
Applying the top-coat
The top coat of epoxy is usually clear. You apply this just like the base coat. Mix the kit, ribbon it out on the floor, spread it around with the rubber magic trowel and back roll it.
The thickness of this coat will determine the final texture of your floor. If you want a smooth floor, apply it a little thicker (80 sq. ft. per gal.) If you want some texture from the chips for a little slip resistance, apply it a little thinner (100 - 120 sq. ft. per gal.)
If you do go a little thicker, make sure you order enough epoxy.
How to install a decorative epoxy chip floor
The finish coat
I always apply a finish coat of urethane over the epoxy. Epoxy dries very hard so it scratches easily. Urethane is very scratch resistant and more chemical resistant than epoxy.
It rolls on very thin, you get about 250 - 300 sq. ft. per gallon. It's well worth the money.
Check out the video below of us installing a decorative epoxy chip floor.

Hi, I am Mike Day, owner of Day’s Concrete Floors, Inc. in Maine. I've been working with concrete for 45 years now, and this website is where I can share with you all the knowledge, wisdom and expertise I've gained from installing all kinds of stamped concrete, concrete floors, concrete overlays, concrete slabs and also repairing & fixing cracked or spalled concrete.
There’s a lot to cover, so if you have any questions, contact me!
CHECK OUT OUR SPONSORS


LEARN HOW TO EPOXY A GARAGE FLOOR

FREE CONCRETE FINISHING TRAINING TUTORIAL VIDEO
Recent Articles
-
The Most Frequently Asked Questions About Concrete
 Find the answers to the most frequently asked questions about concrete on the internet
 -
How Many 60lb Concrete Bags Make A Cubic Yard? The Complete Guide
 Discover the number of 60lb concrete bags needed for a cubic yard. Get accurate calculations for your construction project.
 -
The True Cost of Polished Concrete: A Detailed Breakdown
Get the facts on polished concrete floor cost. Learn average prices per square foot and key factors impacting your budget in this guide -
How To Fix A Leak In A Basement Wall - Foundation Crack Repair
 How to fix a leak in a basement wall. I have a video tutorial that shows you the steps to take to fix a crack in your foundation wall.
 -
How much does a concrete patio cost for 2025 - New Updated Prices
 New and updated prices for what a concrete patio will cost you in 2025.


