How To Build And Pour A Concrete Ramp
This page will show you how to build and pour a concrete ramp.
Make sure to check out my tutorial video at the bottom of the page!
Being in the concrete business, I've had to install concrete ramps for all kinds of entry ways, wheel chair ramps, sloped sidewalks, and garage door aprons.
My 5 basic steps for building and pouring a concrete ramp are:
- Prepare the sub-base
- Build the forms
- Order the right concrete mix
- Pour the concrete
- Finish the concrete

TOOLS AND SUPPLIES NEEDED:
step 1. pREPARE THE SUB-BASE FOR YOUR CONCRETE RAMP
I was hired to form, pour, and finish the concrete for this ramp that made it easier for the homeowner to walk down this steep embankment.
Prepare the sub-grade by removing any sod, grass, and loom.
You want at least a 12 inch gravel or crushed rock sub-base under the concrete ramp.
Dig out the soil (unless it's already gravel) and re-fill with 3/4" crushed gravel or 3/4" crushed rock like we did on this one. Tamp or compact the sub-base as you're filling it to make sure it won't settle later on.
See my list of tools to use below.
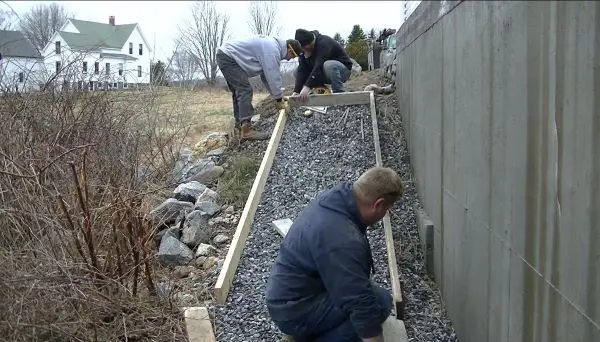
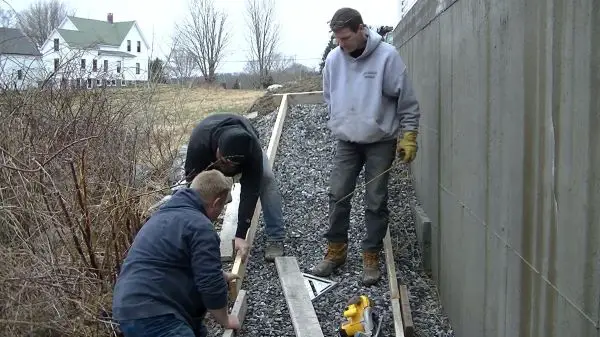
step 2. build your forms
Set your forms according to your thickness. You want the top of the forms to be your finished grade.
This ramp was 6 inches thick so we used 2x6's for our forms. Screw your forms together and use metal pins to secure them in place.
The slope of this concrete ramp was determined by the slope of the embankment, so we set the forms on the sub-grade, leveled them across (east to west) and pinned them in place using metal stakes that had holes in them.
Whether your concrete ramp is like this one or you're matching two different heights (going from ground level and matching a floor level) you'll want to set the top of the forms as your finished ramp level.
It'll make it a lot easier to pour and finish the concrete later on.
step 3. What concrete mix to use for your ramp

If you're ramp is quite large like this one or it's larger, you'll want to order concrete from a ready-mix concrete company. It'll be much easier than trying to mix it by hand.
I use a 4000 psi mix with 3/4" stone, fiber-mesh, and air-entrainment (for freeze/thaw conditions).
When I call to order the concrete, I tell the batch person it's for a ramp and to make sure to batch the concrete at a 3 inch slump. Slump is how "wet" or "dry" the concrete is mixed at.
A 1 to 4 inch slump is quite dry, 5 - 6 slump is looser, (too wet for a ramp), and a 7 - 10 slump is very loose or watery.
I poured this concrete ramp at about a 4 inch slump and had no problems with the concrete wanting to sag as I screeded the concrete up hill.
IF YOU'RE RAMP IS SMALL: You can use a bag mix like Quikrete and mix it in a wheel barrow. Just make sure it's a firm but workable mix when you mix water with it or it'll want to sag and not keep the proper slope.
How thick should a concrete ramp be?
That'll depend on what you're using the ramp for.
In most cases, you'll want your concrete ramp to be 4 to 6 inches thick.
4 inches thick is good for sloped sidewalks, walking paths, and wheel chair ramps.
6 inches thick is better for vehicle traffic and heavier use.
step 4. how to pour a concrete ramp

When the concrete arrives, tell the truck driver to mix the concrete to a 3" slump. The slump you'll need kinda depends on how steep your ramp is.
You're better off starting with a mix that's too dry, you can always add a little water to the mix if you need to. If you start off with a mix that's too wet, it'll make your job a lot harder.
This sidewalk ramp was quite steep. We poured the concrete at about a 4" slump and the mix held its slope just fine. Any looser and it would have sagged too much.
Fill the forms with your concrete mix using a concrete rake like I am in the previous picture.
Once the forms are filled, use a concrete screed and screed "up hill" by dragging the screed on top of the forms.
PRO TIP: The concrete is less likely to sag if you screed up hill versus downhill. The concrete will hold its slope better pulling it upwards (trust me).
We rest the screed on top of the forms while we pull the screed upwards 4 to 6 inches each stroke.
We keep repeating the motion while moving up the ramp until we're done.
step 5. finishing the concrete for your ramp

After you screed the concrete, you'll want to mag float the concrete smooth like I'm doing above.
Mag floating will smoothen the surface and prepare it for you final finish.
For best results, mag float in an upwards motion to keep the concrete from wanting to sag.
PRO TIP: If you're ramp is too large to reach across with just a mag float, you can use a bull float with handles to do the same thing. See below

In the picture above I'm using a bull float tool to smoothen the concrete after we screed it. This was a sloped patio and too far to reach across my hand.

I usually finish all my concrete ramps by dragging a broom across the surface.
This gives the concrete good texture and is considered a non-slip surface.
Before I broom the surface, I usually wait until the concrete is firm enough so I can only press my fingers into it about 1/4". This could be 30 minutes to and hour after you get done pouring the concrete.
Then I mag float the surface again, making sure to fill any imperfection in the surface and I want the concrete freshly magged to have a nice moist concrete paste to broom.
As soon as I mag float this second time, I immediately drag my broom across the concrete creating a nice broom texture as the finished surface.
How do you make a sloped concrete ramp?
I made a video of us building, pouring, and finishing this concrete ramp.
The video will help you understand the concrete slump we use, pouring process, and finishing techniques we use to install our concrete ramps.
IN CONCLUSION: For this job we had to pour a concrete sidewalk on a steep slope to make a ramp for the homeowner to walk down this embankment.
The basics of installing a concrete ramp like this one are the same no matter what the slope is.
Set your forms to finish grade, use a low slump concrete mix and screed up hill if you can. Mag float the surface before you broom finish it for best results.

Hi, I am Mike Day, owner of Day’s Concrete Floors, Inc. in Maine. I've been working with concrete for 45 years now, and this website is where I can share with you all the knowledge, wisdom and expertise I've gained from installing all kinds of stamped concrete, concrete floors, concrete overlays, concrete slabs and also repairing & fixing cracked or spalled concrete.
There’s a lot to cover, so if you have any questions, contact me!
CHECK OUT OUR SPONSORS


LEARN HOW TO EPOXY A GARAGE FLOOR

FREE CONCRETE FINISHING TRAINING TUTORIAL VIDEO
Recent Articles
-
The Most Frequently Asked Questions About Concrete
 Find the answers to the most frequently asked questions about concrete on the internet
 -
How Many 60lb Concrete Bags Make A Cubic Yard? The Complete Guide
 Discover the number of 60lb concrete bags needed for a cubic yard. Get accurate calculations for your construction project.
 -
The True Cost of Polished Concrete: A Detailed Breakdown
Get the facts on polished concrete floor cost. Learn average prices per square foot and key factors impacting your budget in this guide -
How To Fix A Leak In A Basement Wall - Foundation Crack Repair
 How to fix a leak in a basement wall. I have a video tutorial that shows you the steps to take to fix a crack in your foundation wall.
 -
How much does a concrete patio cost for 2025 - New Updated Prices
 New and updated prices for what a concrete patio will cost you in 2025.


