How To Repair And Resurface
Spalling Concrete Patios & Driveways
 We're repairing and resurfacing this spalled concrete patio entry slab
The basic steps to repair spalled concrete are:
- Remove the loose and damaged concrete.
- Clean the concrete by pressure washing or grinding it.
- Patch the deep areas (1/8" or more) with the resurfacing material first and let dry.
- Smooth the patched area by grinding or using a rubbing stone.
- Resurface the entire area using Ardex CD or Rapid Set NewCrete.
- Apply broom finish immediately after applying the concrete resurfacer.
 Spalled and salt damaged concrete
What causes concrete to spall?
Spalling concrete is mostly caused in areas where the concrete is exposed to freeze and thawing conditions.
Here's what happens:
Water gets absorbed into the concrete capillaries (pores).
When that water freezes inside the concrete, it expands causing microscopic damage (cracking) just under the surface of the concrete.
Eventually (and sometimes immediately) this damaged concrete starts to pop off the surface after repeated freeze and thawing cycles.
Do de-icers and salt cause spalling on concrete surfaces?
 This is concrete damaged by using de-icers - leading to spalling.
They can for sure cause it and they can also make it appear sooner rather than later.
De-icing materials like calcium chloride and salt will melt frozen ice and snow at or below freezing temperatures.
This melted snow and ice gets absorbed into the concrete, the di-icer wears off and the water re-freezes.
Repeating this process over and over again during winter causes a lot of stress on the concrete and the surface spalls, scales or gets pitted.
Watch us repair and resurface this salt damaged concrete patio
How to fix spalling concrete: step by step

STEP 1. Remove all the loose and damaged concrete by using a hammer, a chisel, an electric hammer drill with chisel bit, or a hand grinder. My preference is a small hand grinder unless I have a very large area, then I'll use a walk behind grinder.
 I'm using a 4" Dewalt grinder to remove the spalled concrete
This is how big the spalled area grew after grinding it and removing all the damaged concrete.
There was a lot of damaged (soft) concrete under the surface that you couldn't see just by looking at it.
All this area would have eventually spalled off if it wasn't repaired.
 The damaged area after grinding
STEP 2. Clean the entire area to be resurfaced by grinding or pressure washing it.
Again, my preference is lightly grinding the surface, but a good pressure washer will clean the concrete just fine.
NOTE: If you pressure wash it, let it dry out for 24 hours before resurfacing it.
 I'm lightly grinding the good surface to clean it and prep for the resurfacer
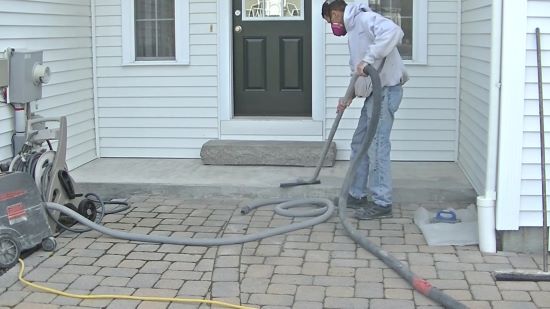 Vacuum the entire area to remove any dirt, dust, and debris.
STEP 3. Patch any deep spalled areas before you resurface the concrete. You can use the resurfacing material as your patching material also.
A deep area would be anything 1/8 inch deep or more.
Make sure to leave the patched area slightly higher than the surrounding concrete.
The patched areas usually dry in 30 to 45 minutes so you can proceed with the resurfacing.
 I'm repairing the spalled area before I resurface the patio.
If you try to resurface the concrete without fixing the deep areas first, the resurfacing material will finish up lower than the rest of the concrete.
It is only designed to be broom finished at 1/8 inch thick or a little less.
Trying to broom finish it from a thin area to a thick area always leaves the thicker area a little lower and it doesn't look very good.
I use both Ardex CD and Rapid Set NewCrete when I patch and resurface my concrete jobs.
Both are very good products. I've used both of them for years and had very good results with my resurfacing projects.
Rapid Set NewCrete you can get online through my link for Home Depot or get it at the store.
Ardex CD is usually supplied by a concrete supply store that distributes their product line.

STEP 4. Lightly grind the patched areas to match the surrounding areas.
Vacuum again to clean up any dust and you're ready to resurface.
STEP 5. Mix your concrete resurfacing material and start spreading it on the surface of your concrete.
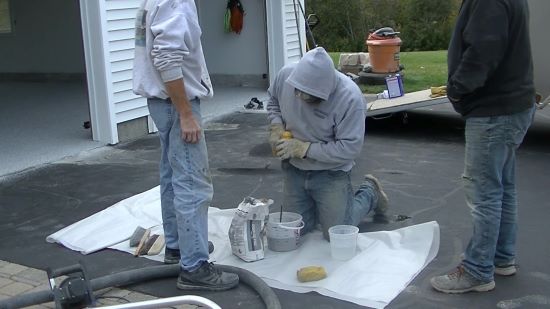 Mixing the resurfacing material to a pancake like consistancy
Use a drill and mixing paddle to mix your concrete resurfacer.
The bag has mixing instructions and tells you how much water you need to add.
It also tells you how much area it will cover. I can usually resurface about 75 square feet per bag @ 1/8 inch thick of Ardex CD or Box of NewCete.
If you're just mixing a small batch, I like to mix it kind of like a pancake batter mixture.
Some of the tools you'll need to repair and resurface your concrete:
- Hammer
- Chisel
- Dewalt 4 or 5 inch grinder
- Diamond cup wheel for grinder
- Vacuum for grinder and cleaning
- Dust mask
- Drill for mixing
- Mixing paddle
- Steel hand trowel
- Mixing bucket
- Concrete broom
You can find all these tools right on Amazon.com
Disclaimer: I am an affiliate of Amazon, if you click my links and buy from Amazon within 24 hours I will make a small commission. Thank you for any and all support you give to me and this website!
 Start at one end and work to the other
After you've mixed your material, start spreading it onto the concrete.
I like to use a steel hand trowel, keep it thin, remember about an 1/8 inch thick is plenty.
STEP 6. As soon as you've spread out a small area, apply the broom finish to it. Don't wait too long or spread out too much material.
It drys pretty fast, especially if it's hot out or you're working in the sun.
 Apply your broom finish as soon as possible after troweling
Keep working in a consistent manner without stopping. It helps to have a second helper to do the brooming if possible.
 Keep moving from one end to the other without stopping if you can.
This is what your spalled or salt damaged concrete will look like after you repair and resurface it.
Just like a newly poured concrete patio.
This method can be used for repairing and resurfacing concrete driveways, walkways, and pool patios.
I do recommend using a concrete sealer to protect your resurfaced concrete.
I use Foundation Armor's AR 350. This is an excellent concrete sealer that's very easy to apply.
 This is the concrete patio all repaired and resurfaced
Watch another video of me using Rapid Set NewCrete to resurface an old worn concrete patio slab.

Hi, I am Mike Day, owner of Day’s Concrete Floors, Inc. in Maine. I've been working with concrete for 45 years now, and this website is where I can share with you all the knowledge, wisdom and expertise I've gained from installing all kinds of stamped concrete, concrete floors, concrete overlays, concrete slabs and also repairing & fixing cracked or spalled concrete.
There’s a lot to cover, so if you have any questions, contact me!
CHECK OUT OUR SPONSORS


LEARN HOW TO EPOXY A GARAGE FLOOR

FREE CONCRETE FINISHING TRAINING TUTORIAL VIDEO
Recent Articles
-
The Most Frequently Asked Questions About Concrete
 Find the answers to the most frequently asked questions about concrete on the internet
 -
How Many 60lb Concrete Bags Make A Cubic Yard? The Complete Guide
 Discover the number of 60lb concrete bags needed for a cubic yard. Get accurate calculations for your construction project.
 -
The True Cost of Polished Concrete: A Detailed Breakdown
Get the facts on polished concrete floor cost. Learn average prices per square foot and key factors impacting your budget in this guide -
How To Fix A Leak In A Basement Wall - Foundation Crack Repair
 How to fix a leak in a basement wall. I have a video tutorial that shows you the steps to take to fix a crack in your foundation wall.
 -
How much does a concrete patio cost for 2025 - New Updated Prices
 New and updated prices for what a concrete patio will cost you in 2025.


