How to Use a DeWALT 20 Volt Max Rotary Laser for Beginners
Updated: 03/24/2024
Author: Mike Day
Welcome to the world of precision and ease in construction and DIY projects! Whether you're leveling a sub-grade of gravel, ensuring a concrete floor is flawlessly level, or setting up forms for a concrete slab, a self-leveling laser is your best friend.
Today, we're focusing on the DeWALT 20 Volt Max Rotary Laser, a tool known for its reliability, accuracy, and user-friendliness. Let's dive into a step-by-step guide designed for beginners, ensuring you can set up and use your new laser like a pro.

General Tips for Using DeWALT Self-Leveling Lasers
- Battery Life: Always check the battery before starting your work. DeWALT lasers have good battery life, but it's best to start with a full charge or have spare batteries on hand.
- Visibility: In bright conditions, visibility of the laser line might be reduced. Use a laser detector/receiver for outdoor applications, especially over long distances.
- Maintenance: Keep the laser clean and protected when not in use. Dust, dirt, and drops can affect accuracy.
- Safety: Never look directly into the laser beam, and be mindful of others around you. Use the provided safety glasses to enhance beam visibility while protecting your eyes.
In my opinion, using a laser level is the fastest and most accurate way to set grades and level forms when doing concrete work.
I've been using laser levels for leveling my floors and slabs since the early 1990's.
My go-to, all time favorite laser level is the DeWALT 20 V Max Rotary Laser.
Getting to Know Your DeWALT 20 Volt Max Rotary Laser
Before we start, let's familiarize ourselves with the tool. Your DeWALT 20 Volt Max Rotary Laser comes with a few key components: the laser unit itself, a battery, a laser detector (for outdoor use), and a tripod or grade rod (optional but highly recommended for accuracy).
What I like most about using a laser level:
- Fast and easy set-up
- Self-levels itself with one push of a button
- Only takes one person to set grades
- Accurately levels floors, walls, and forms
- Easily set slopes to forms and floor drains
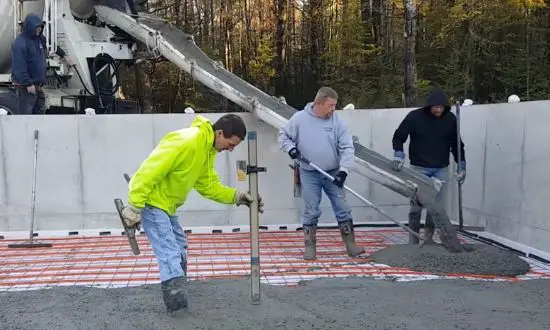
In the picture above, I'm using the laser level to set the grade of the concrete floor around the perimeter and in the middle of this pour.
Step 1: Safety First
- Read the manual: Every tool has its quirks. Spend some time with your DeWALT laser's manual to understand its features and safety precautions.
- Wear safety glasses: Always wear safety glasses when operating the laser, especially outdoors, to protect your eyes and enhance visibility of the laser.
Step 2: Setting Up Your Laser
- Install the battery: Make sure your laser’s battery is fully charged and installed correctly.
- Find a stable surface: For indoor use, a flat, stable surface or a tripod is ideal. For outdoor applications, a tripod is necessary to elevate the laser for broader visibility.
- Turn on the laser: Power up your DeWALT laser. It will self-level in a few seconds, indicated by a stable, uninterrupted beam or line.
Step 3: Leveling a Sub-Grade of Gravel
Preparing the Site
- Clear the area of large debris and stones. The smoother the surface before you start, the easier your leveling process will be.
Using the Laser
- Position the laser at one corner of the area you're leveling.
- Turn on the laser, allowing it to self-level. You’ll see a spinning laser beam if it's in rotary mode.
- Walk around with the laser detector attached to a grade rod. The detector will beep when it intersects with the laser beam.
- Adjust the grade by adding or removing gravel until the detector consistently beeps at your desired height across the entire area.
Step 4: Leveling a Concrete Floor or Slab
Before Pouring Concrete
- The process is similar to leveling gravel but requires a bit more precision since concrete is less forgiving.
Using the Laser
After Pouring Concrete
- Set up the laser on a stable surface or tripod, ensuring it's centrally located to the area you're working on.
- Establish a reference point on a wall or a piece of lumber that’s securely fastened and level.
- Use the detector on a grade rod to transfer this level around the room or area, marking at intervals to guide your pour.
- Use a straight edge or screed board, moving it across the forms, guided by the level marks you've made to ensure the concrete is level.
Step 5: Leveling Forms for a Concrete Slab
Setting Up
- Before pouring concrete for a slab, you'll need to set up and level your forms correctly.
Using the Laser
- Place the laser in a central location to the forms you're setting up.
- Adjust the laser so it's level (it will do this automatically, but ensure it's correctly calibrated).
- Use the laser detector on a grade rod to measure the height of the laser beam from the ground at various points along the forms.
- Adjust the forms so that the laser detector reads consistently along the entire length of the forms, ensuring they are level.
Additional Tips
- Patience is key: Take your time with each step, especially when adjusting gravel or concrete. Small adjustments can make a big difference.
- Battery life: Keep an extra battery on hand, especially for larger projects. You don't want to run out of power midway through.
- Cleaning and maintenance: After each use, clean your laser level and store it in its case to protect it from dirt and damage.
It's great that you're interested in leveraging my expertise on laser levels, particularly for applications in grading, concrete work, excavation, and various projects requiring precise leveling.
DeWALT's lineup of self-leveling lasers is known for robustness, accuracy, and user-friendliness, making them a popular choice among professionals and DIY enthusiasts alike. Let's delve into how you can effectively use these tools across different projects:
Grading Work
- Site Preparation: Clear the area of debris and obstructions to ensure accurate readings. Use your DeWALT self-leveling laser to establish a reference point.
- Setting Up the Laser: Position the laser level on a tripod or a stable surface at the site's center. Ensure it's level using the device's self-leveling feature. For grading, you'll often use a laser receiver mounted on a grade rod to detect the laser.
- Taking Measurements: Walk the receiver across the site, noting the height differences from the laser's consistent level beam. This will guide you in adding or removing soil to achieve the desired grade.
Concrete Work
- Foundation Layout: Before pouring concrete, use your laser level to mark the desired height on stakes around the work area. This helps in creating forms that are level and at the correct height.
- Leveling Concrete: After pouring, drag a straight edge across the forms, using the laser level as a guide to ensure the surface is perfectly flat and level.
Excavation Work
- Determining Depth: Before excavation starts, set the laser level to mark the desired excavation depth on a nearby stake or directly at the site. This serves as a visual guide for the excavation depth.
- Monitoring Excavation: As you dig, periodically check the depth against the laser level to ensure you're not going too deep or shallow. Adjust your excavation based on the laser level's guidance.
Conclusion
Congratulations! You've taken your first steps into using a self-leveling laser for your projects. The DeWALT 20 Volt Max Rotary Laser is a versatile tool that, once mastered, can significantly increase the precision and efficiency of your work. Remember, practice makes perfect. Don't hesitate to use your laser on smaller, practice projects before tackling larger endeavors. Here's to perfectly level projects ahead!
You can buy the DeWALT 20 V Max Rotary Laser right on Amazon.
You will need to purchase the DeWALT Tripod. This is the same one I use.
Disclaimer: I am an affiliate of amazon. If you purchase the laser or tripod through one of my links within 24 hrs, everything-about-concrete.com will receive a small commission. Thank you, it helps support this site.

Hi, I am Mike Day, owner of Day’s Concrete Floors, Inc. in Maine. I've been working with concrete for 45 years now, and this website is where I can share with you all the knowledge, wisdom and expertise I've gained from installing all kinds of stamped concrete, concrete floors, concrete overlays, concrete slabs and also repairing & fixing cracked or spalled concrete.
There’s a lot to cover, so if you have any questions, contact me!
CHECK OUT OUR SPONSORS


LEARN HOW TO EPOXY A GARAGE FLOOR

FREE CONCRETE FINISHING TRAINING TUTORIAL VIDEO
Recent Articles
-
The Most Frequently Asked Questions About Concrete
 Find the answers to the most frequently asked questions about concrete on the internet
 -
How Many 60lb Concrete Bags Make A Cubic Yard? The Complete Guide
 Discover the number of 60lb concrete bags needed for a cubic yard. Get accurate calculations for your construction project.
 -
The True Cost of Polished Concrete: A Detailed Breakdown
Get the facts on polished concrete floor cost. Learn average prices per square foot and key factors impacting your budget in this guide -
How To Fix A Leak In A Basement Wall - Foundation Crack Repair
 How to fix a leak in a basement wall. I have a video tutorial that shows you the steps to take to fix a crack in your foundation wall.
 -
How much does a concrete patio cost for 2025 - New Updated Prices
 New and updated prices for what a concrete patio will cost you in 2025.


