Forming Concrete Countertops
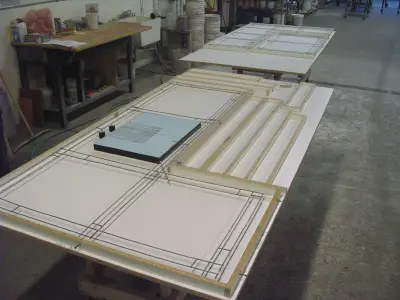
Forming concrete countertops using the precast method.
The process of pouring concrete countertops begins by creating very accurate templates of the existing counter space. The forms for the countertops will be made from the templates.
HOW TO FORM A CONCRETE COUNTERTOP
Create a template by connecting strips of wood veneer. The template should be the exact size of the countertop base or cabinet top, not the size of the countertop that will go on it. Using wood veneer strips, secure the strips to the surface of the cabinet top with the hand stapler.
On corners, use a diagonal piece for extra support secured using a hot glue gun. If the template is particularly long or wide, add strips for cross supports. Score and snap off the ends with a utility knife and square.
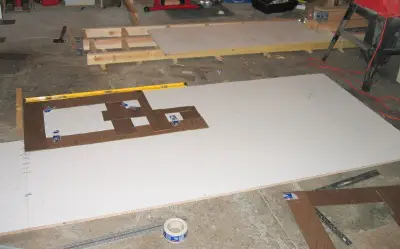
When you're forming concrete countertops, the template-making process is the time to decide on design features like control seams and countertop overhangs. If countertops are made in sections larger than about 8 feet, they are prone to cracking and more difficult to move. Reduce the chances for cracking by incorporating joints or seams in the countertop.
Countertop overhangs, the countertop lip that extends beyond the face of the countertop, are usually 1/2 inch for standard cabinets and 3/4 inch for flush cabinets.
Mark the seam locations and overhanging edges on your template with a permanent marker.
To ensure accuracy, measure the countertop base again and write these measurements on the template.
Remove the template from the countertop and move it to where the countertop mold will be made.
WHAT IS THE BEST MATERIAL FOR FORMING CONCRETE COUNTERTOPS?
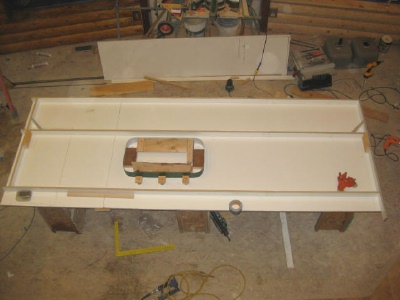
The forms are built with 3/4 inch thick melamine, a medium-density fiberboard with a smooth laminate finish that the concrete won't stick to and which will produce a smooth, even surface for the countertop.
When buying melamine, it is important to buy pieces with perfectly smooth surfaces; cracks or dents will transfer to the surface of the countertop.
To create the forms flip over the templates and trace them onto the surface of the melamine with a pencil. It is important to flip the template because the concrete is poured face down. The bottom of the mold will be the top of your countertop.
Don't forget to transfer your seam locations and overhangs onto the forms. Trace the overhang on the edge of the form that will have the overhang.
An easy way to do this is to get a small wooden block, the same width of your overhang, and run it along the edge of the template to create a uniform overhang.
Using a table saw with a new sharp blade, cut out the sides and bottom of the mold. The bottom of the form is the area that was traced out. The sides should measure the length of the corresponding side of the mold plus a width of 2 3/4 inches.
The width of the sides equals the thickness of the countertop, 2 inches, added to the thickness of the 3/4 inch melamine.
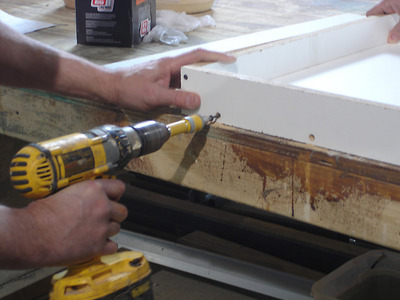
Construct your forms by attaching the sides to the bottom of the form with a screw gun and screws.
The interior of the forms should be all laminate surface with no exposed particle board. Attach the sides to the bottom of the mold with screws placed at each corner 6 to 8 inches apart.
Pre-drilling all your holes will ensure nice clean corners and seams.
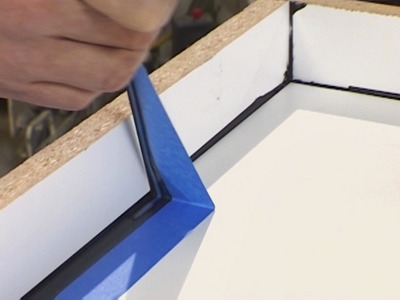
The next step to forming concrete countertops is to seal the mold and create the edges of the countertop using silicone caulk. Lay blue painter's tape on either side of your seams at the bottom and edges of your mold to create a uniform beveled edge.
Lay a bead of 100% silicone caulk along all seams. Run a finger along the joints to move the silicone into the joints and create a uniform beveled edge. Use the same finger around your edges and don't stop or you will create a stop-and-start mark in the silicone that will transfer to the countertop edge. Allow the silicone to dry completely.
While the silicone is drying, prepare the worktable. You want to pour the concrete on a raised surface, about waist high, that is perfectly level in all directions. If you do not have a table, you can create one by running wooden 2 x 4s across three saw horses and covering those boards with a 3/4 inch sheet of plywood.
Once the table is prepared, and the silicone is dry, prep the mold for the concrete. Remove the blue tape, and run your thumb along the silicone to remove any imperfections.
Clean the forms with clean rags and either denatured alcohol or acetone. These liquids will remove dirt and any excess water from the mold. Always Wear protective gloves while cleaning the mold.
Click on the links below for more information:
HOW TO MAKE CONCRETE_COUNTERTOPS
CONCRETE_COUNTERTOP FACTS
CONCRETE_COUNTERTOP REINFORCEMENT
FINISHING CONCRETE_COUNTERTOPS
Return from Forming Concrete Countertops to Concrete Countertops
Return from Forming Concrete Countertops to Everything About Concrete Home Page
